The main concept of Trading activities are receipt of goods and delivery of goods. We generally call them PURCHASE or SALE activities. The trading items can be RAW MATERIAL, FINISHED GOODS, SEMI-FINISHED GOODS, etc. For better Organization you can use the group and sub-group for classification of the trading item.
Inventory Master from Chart of Accounts :
- Gateway of Tally > Chart of Accounts
 68 68
You can create the inventory from this menu, which contains the following options :
-
Stock Group : Create your group here, for example, Raw Materials, Work-in-progress, Finished Goods, etc.
-
Stock Items : Create your Stock Items here, for example, TV, Sound System, VCD, etc.
-
Unit of Measurement : Create your measurement Unit for Items, for example, LTR. MTR, PCS, BOX etc.
Before creating the Inventory info menu we should know what stock groups, stock items and units of measurement are.
What are Items, Groups and Units ?
Stock Items :
Stock items are the primary inventory entity, like Ledgers. Usually it means Item or Product, which can be buying, selling or issue for production purpose. Each item is required to be accounted for, and receipt or issue needs to be created. In fact, you will create a stock ledger account for each item and TallyPrime calls this account “Stock Item”.
Stock items are goods that you manufacture or trade (sell and purchase). It is the primary inventory entity. Stock Items in the Inventory transactions are similar to ledgers being used in accounting transactions.
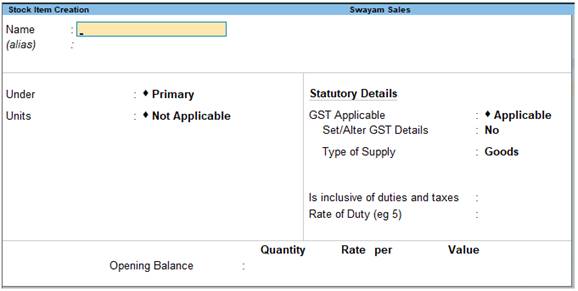
1. Gateway of Tally > Create > type or select Stock Item > and press Enter.
Alternatively, press Alt+G (Go To) > Create Master > type or select Stock Item > and press Enter.
 76 76
2. Name & alias: As in other masters, you can specify multiple aliases for the stock item.
3. Under: Select Primary or an existing Stock Group. If you have not created any Stock Group, you can create one in TallyPrime to assign to the stock item.
As always, press Alt+C, to create a master on the fly. Alternatively, press Alt+G (Go To) > Create Master > type or select Stock Items > press Enter.
4. Units: Select the unit of measurement applicable for the stock item. If the unit is not listed, you can create the unit of measurement in TallyPrime to assign to the stock item.
As always, press Alt+C, to create a master on the fly. Alternatively, press Alt+G (Go To) > Create Master > type or select Units > press Enter.
5. Statutory Details: Set the applicable Taxability option for the stock item under Statutory details, The option will depend on the option enabled in the F11 (Features) screen.
6. Opening Balance: Specify the opening balance for the Stock Item as on the date of Beginning of Books.
Quantity: Specify the stock item Quantity.
Rate: Specify the stock item Rate.
Value: TallyPrime automatically calculates the value by multiplying the Quantity and Rate. You can also edit the value, TallyPrime automatically refreshes the Rate field accordingly.
7. Accept the screen. As always, press Ctrl+A to save.
1. Setting GST Details in Stock Item ( Tax On Value)in TallyPrime
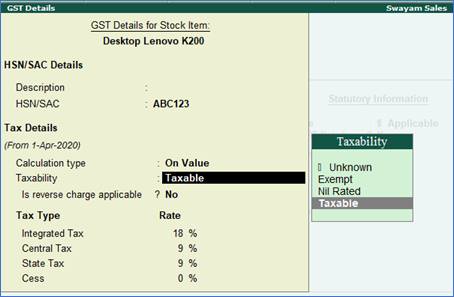
If GST is enabled, set GST Applicable to Applicable and enter the GST details by enabling the option Set/alter GST Details to Yes. You will get the window of GST Details for Stock Item as below:
 77 77
Taxability :
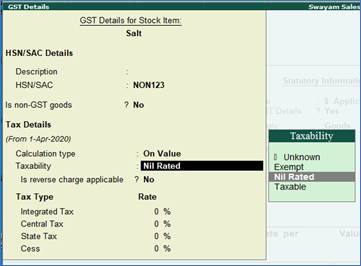
Select Taxable for goods and services that are classified as taxable type of supply under GST. Select Exempt , if the type of supply is exempted from tax under GST, or select Nil Rated , if the tax rate applicable to the type of supply is 0% under GST.
Integrated Tax :
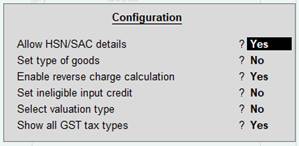
When you enter the integrated tax, state tax and central tax are calculated as half of the integrated tax specified. You can change state tax or central tax, and manage other GST details by using F12 configuration.
 78 78
Press Ctrl+A to save.
7. Specify the details of Opening Balance , if any, for the Stock Item as on the date of Beginning of Books.
-
In the Quantity Field, specify the stock item Quantity.
-
In the Rate field, specify the stock item Rate.
-
In the Value field, TallyPrime automatically calculates the value by multiplying the Quantity and Rate. You can also edit the value, TallyPrime automatically refreshes the Rate field accordingly.
The Stock Item Creation screen appears as shown:
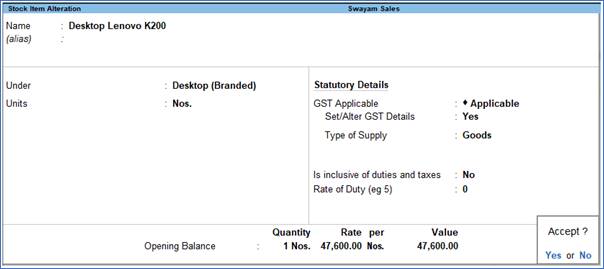 79 79
Create the following Items and Goods will all Details given…like Stock Group, HSN Code, GST Rate, Opening Quantity with Rate:
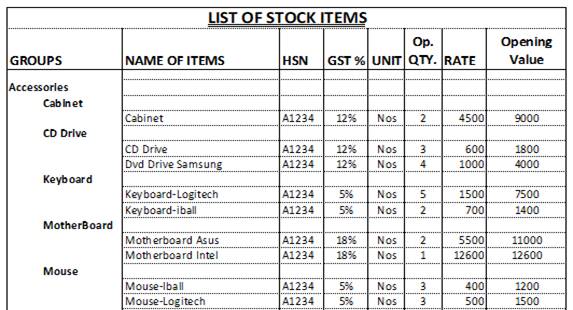
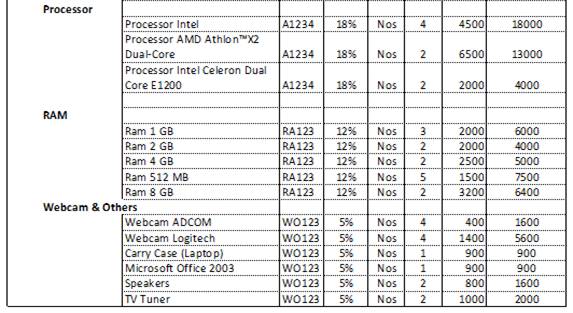

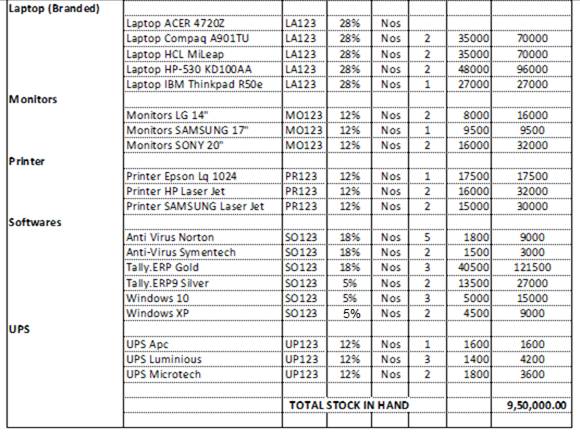
2. Setting Slab-wise GST Details in Stock Item (Tax On Item Rate)in TallyPrime
1. Gateway of Tally > Create > type or select Stock Item > and press Enter.
Alternatively, press Alt+G (Go To) > Create Master > type or select Stock Item > and press Enter.
2. Set/Alter GST Details - Yes .
3. Calculation type - On Item Rate .
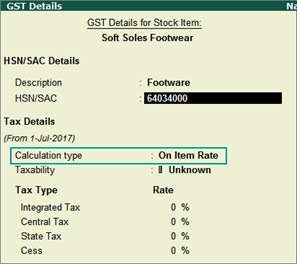 80 80
The Tax on Item Rates screen appears.
-
Consider additional expense/income ledger for slab rate calculation - Set this option to Yes when you want to apportion additional expenses in slab rate calculation for a stock item.
-
Under Rate , set the slab rates in Greater than and Up to .
-
Set the Tax Type and Integrated Tax Rate . The Central Tax Rate and State Tax Rate will get automatically calculated.
 81 81
4. Press Ctrl+A to accept the GST Details screen.
5. Save the details in the Stock Item Alteration screen.
3. Setting MRP details in Stock Items in TallyPrime
To capture the MRP of stock items in the invoice, you have to enter the MRP details in the stock item master.
1. Click F12: Configure in the Stock Item Alteration / Creation screen.
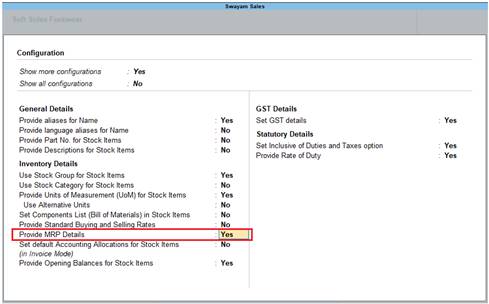 82 82
2. Allow MRP Details - Yes .
3. Press Ctrl+A to accept.
To enter the MRP for the stock item
1. In the Stock Item Alteration screen, enable Set/alter MRP details?
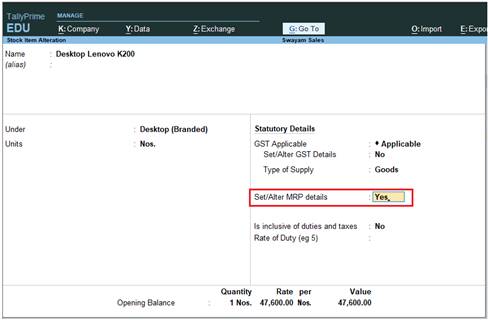 83 83
2. In the MRP Details screen:
-
Allow Set/Alter MRP details ? - Yes , if you want to modify the MRP during the transaction.
-
Consider MRP for calculation of GST rate in Slab rate? - Set this to Yes if you want the MRP of a stock item to be considered for GST rate calculation when slab rates are applicable. In this case, the tax amount still gets calculated on the selling price of the item.
-
Enter the MRP Rate/Margin .
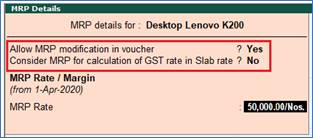 84 84
3. In the Stock Item Alteration screen, press Enter to save.
4. Setting ‘Nil-Rated’ , ‘Exempted’, ‘Zero Rated’ & ‘ Non-GST’ Items & Goods using TallyPrime
With the introduction of GST, the goods and services have been classified into Nil Rated, Exempted, Zero Rated and Non-GST supplies. The Purchase or Sales of these goods to a local or interstate customer does not attract GST, and can be recorded using a Purchase / Sales voucher. Let us take a look at what distinguishes each of them with some examples:
| Supply |
GST Applicable |
Type of Supply |
Eligibility for ITC |
Examples |
NIL Rated |
0% |
Everyday items |
No |
Grains, Salt, Jaggery, etc. |
Exempted |
- |
Basis essentials |
No |
Bread, Fresh Fruits, Fresh Milk, Curd etc. |
Zero Rated |
0% |
Overseas supplies, Supply to Special Economic Zones (SEZ) or SEZ Developers |
Yes |
- |
Non- GST |
- |
Supplies for which GST is not applicable but can attract other taxes |
No |
Petrol, Alcohol etc. |
In case of above Items and Goods , the option Nil Rated / Exempt has to be selected as the Taxability in the GST Details screen of the item or item group master.
4.1. Setting Nil-Rated & Exempted items and Goods :
 85 85
[Practical Assignment-10]
Swayam Sales deals the following Nil-Rated / Exempted Items and goods which purchased and sold in his business. Create the following Items as details given.
Name of Items |
Unit of Measurement |
Taxability of GST |
Moong Dal |
(Unit is Kg. with Decimal 3) |
with Nil Rated GST |
Salt |
(Unit is Kg. with Decimal 3) |
with Nil Rated GST |
Bread |
( Unit is Pcs.) |
with Exempt GST |
Fruits |
( Unit is Kg. with Decimal 3) |
with Exempt GST |
4.2. Setting Non-GST Goods :
Some goods such as petroleum crude, high-speed diesel, motor spirit (petrol), natural gas, aviation turbine fuel, and liquor fit for human consumption, are not covered under GST and hence are classified as non-GST goods. In TallyPrime, items can be set as non-GST goods.
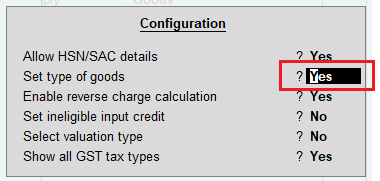
1. In the GST Details screen of the stock item or stock group, click F12: Configure .
2. Enable the option Set type of goods? To Yes
 86 86
3. Press Ctrl+A to accept.
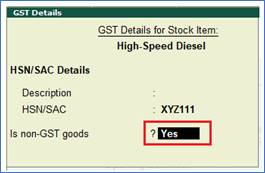
4. In the GST Details screen, set the option Is non-GST goods? to Yes to configure the item/group as Non-GST.
 87 87
5. Press Ctrl+A to accept.
6. Save the item or group master. |


 68
68 76
76 77
77 78
78 79
79


 80
80 81
81 82
82 83
83 84
84 85
85 86
86 87
87


