Deposit Slip-Banking @ Tally.ERP9 |
The Deposit Slip option in the Banking menu allows the user to generate the deposit slip for payments received through cheque/dd which need to be deposited into the bank.
Accessing Deposit Slip
To access Deposit Slip screen,
p Go to Gateway of Tally > Banking > Deposit Slip.
p The Select Bank screen displaying the List of Bank appears as shown
|
 |
| p Select the required Bank account and press Enter. |
| The Deposit Slip screen of the selected Bank is displayed as shown: |
 |
p Select the required row from the Deposit Slip list and press Enter to open the voucher in
alteration mode.
p F2: Period: Allows to change the period.
p F4: Bank: Allows to select other required Bank from the list
p F7: Edit Ch Details: Allows to edit/update the Received From Name and Instrument No as shown |
 |
| n Accept the screen to save the settings |
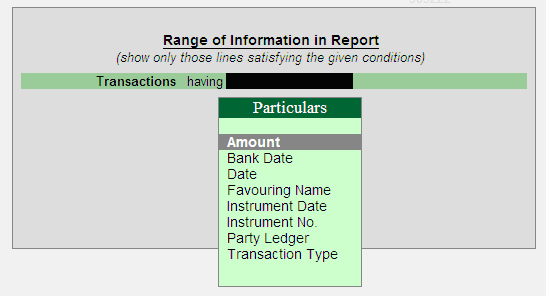
| F12: Range: Allows to filter the Deposit Slip screen. The user may filter the cheque details based on the Amount, Bank Date, Date, Party Ledger, etc as shown: |
 |
Printing Deposit Slip / Deposit Slip Report
The user may select All or the required receipts to be included in the Deposit Slip. The Deposit
Slip report will print all the receipts for the selected period.
Printing Deposit Slip
To Print the Deposit Slip:
p Go to Gateway of Tally > Banking > Deposit Slip
p Select the required Bank account from List of Bank.
p The Deposit Slip screen is displayed with the list of receipts. To include all the receipts in the Deposit Slip:
p Click Print or Press Alt+P.
To include selected receipts in the Deposit Slip:
p Press Spacebar to the required receipt row(s).
p Click Print or Press Alt+P. |
| The Printing Deposit Slip screen appears. |
 |
p Click No or Press N or Esc to set the other options as follows:
n Print Deposit Slip: By default, this option is set to Yes
n Date of Printing: By default, the current date is displayed. Specify the required date to be printed in the Deposit Slip.
n Space to leave on top (default 0.5 inches): Set the required space.
n Show Received From: Set this option to Yes to print the Received From details in the deposit slip.
n Print Comany’s Telephone Number: Set this option to Yes to print the Company’s Telephone Number
n Print Company’s PAN/IT Number: By default, this option is set to Yes |
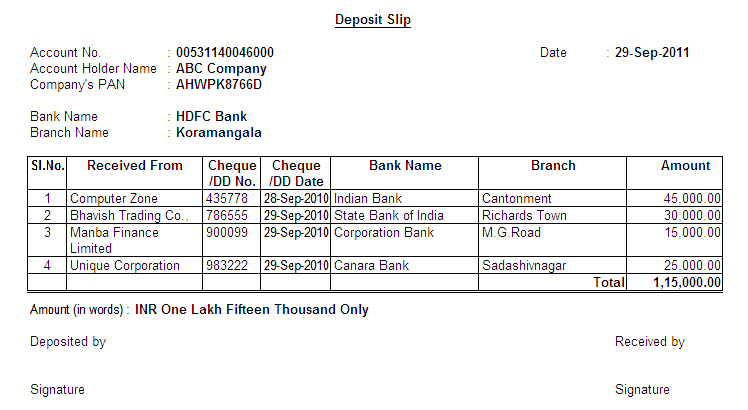
| The Deposit Slip is displayed as shown: |
 |
Printing Deposit Slip Report
To Print the Deposit Slip Report,
p Go to Gateway of Tally > Banking > Deposit Slip.
p Select the required Bank account from List of Bank.
p Click Print or Press Alt+P.
The Printing Deposit Slip screen appears.
p Click No or Press N or Esc to set the other options as follows:
n Print Deposit Slip: By default, this option is set to Yes. Set this option to No to print the report.
n Show Forex Transactions only: By default, this option is set to No. Set this option to Yes in case you need only the forex transactions to be displayed in the report
n Show Received From: Set Yes to print the Received From details in the report.
n Show Bank/Branch Name also: Set this option to Yes to display the Bank and
Branch columns in the report.
n Show Remarks also: By default, this option is set to No. Set Yes to print the Remarks in the report.
p Accept to Print
|
| The Deposit Slip Report is displayed as shown: |

|
Configuring Deposit Slip
The user may configure the Deposit Slip screen based on his requirement. To configure,
p Press F12: Configure, the Configuration screen is displayed as shown: |
 |
Show Forex Transactions only:
By default, this option is set to No. Set it to Yes to display only the forex transactions. |
Show Received From:
By default, this is set to No. Set it to Yes to display Received From column in the Deposit Slip screen to specify the details as shown: |
 |
Show Bank/Branch Name also:
By default, this is set to No. Set it to Yes to display the Bank and Branch columns in the Deposit
Slip screen.
Show Remarks also:
By default, this is set to No. Set it to Yes to display Remarks in the Deposit Slip screen.
Appearance of Name:
Select the required Display Name Style from the list to display in deposit slip screen.
Scale Factor for Values:
Select the required Scale Factors from the list.
Sorting Method:
Select the required Sorting Methods from the list. |
| |
|


 @ Rs. 700")
 @ Rs. 600")
 @ Rs. 550")
 @ Rs. 600")
 @ Rs. 600")