The POS (Point-of-Sales) Invoice feature allows you to create invoices at a point of sales and to collect payment from your customers. POS can be a Retail Outlet, a Checkout Counter in a Shop, or any other Location where a sale transaction takes place.
POS system is a computerized Cash Register which adds up the Sales Totals, calculates the balance to be returned to buyer and automatically adjusts the inventory levels to reflect the quantity sold. The equipment require for POS to work effectively are Cash Register, Card Register, Bar-Coders, Scanners and so on.
Advantages of Point of Sale system are :
-
It helps to calculate sales and operate the Cash Drawer.
-
It manages Inventory and facilitates the Barcode Scanner operations.
-
It offers a flexible and simpler way of querying your inventory and Sales Database.
-
It helps you track product movement and the cost to push certain brands over others.
-
It tracks and records the date and time of every sale made at your point of sale.
Illustration for POS
Consider M/s Swayam Plaza, a leading Retail chain, which deals in Grocery Products including Fresh Foods, ready to eat Food and other Non-Food items.
Step 1 : Creating Voucher Type
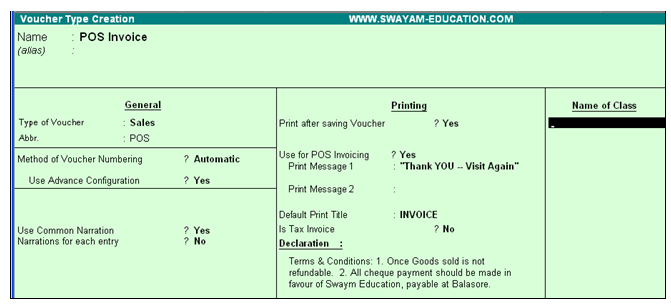
The First Step to enable POS Invoicing is to create a POS Invoice Voucher Type. Using Voucher class, you can pre-define accounts, limit the list of ledgers for selection during voucher entry, automate Ledger posting associated with Stock items and create auto selection for GST, Discounts and Rounding off.
Go to Gateway of Tally.ERP à Accounts Info à Voucher Types à Create
In the Voucher Creation screen,
-
Type the name of the Voucher Type as “ POS Invoice”
-
Select the Voucher Type as ‘Sales’ from the List of Voucher types.
-
Type the abbreviation as ‘POS’
-
Set Use for POS Invoicing to YES.
-
Specify the Default Print Title as ‘TAX INVOICE’
-
Method of Voucher Numbering is set by default to Automate, but can be set to Manual or None
-
The Start number field is set to 1 by default.
-
Print after saving is set to YES by default. You have the option to set it to No.
-
Use Common Narration will be by default set to NO.
-
You will find Two Additional fields for messages and can use them as per your requirements. Type “Thank You – Visit Again” in the print message 1 field.
The complete POS Invoice Voucher Type screen appears as shown :
Step 2 : Creation of Master
Create the Purchase Ledger and Sales Ledger in the books of M/s Swayam Plaza
Go to Accounts Info à Ledger à Create
LEDGER |
UNDER GROUP |
Inventory Values are Affected |
Purchases |
Purchase Account |
Yes |
Sales |
Sale Accounts |
Yes |
Step 3 : Creation of Stock Item
Create Stock Item with Standard Price. To set standard Rates for Stock Items, activate ‘Allow Standard Rates for Stock Items’ in F12 : Configure.
Go to Gateway of Tally.ERP à Inventory Info à Stock Items à Create
-
Name : Type Pepsodent – 150 gm.
-
Under : Select FMCG. ( Press ALT + C to create Stock Group – FMCG under primery)
-
Units : Select Nos. ( Press ALT + C to create a simple unit of measure – Nos ).
-
Set Standard Rates ? : Set YES’ . This displays a screen where the Standard Rates can be specified.
-
Under Standard Cost, specify the rate as 15 and under Standard Selling Price specify the rate as 20.
-
The in the field Applicable from is 1-4-2017.
-
Press Enter to Accept the standard rate settings.
Assign the GST Rate i.e.12% under Statutory Information

- The complete Stock Item Creation screen appears as shown :
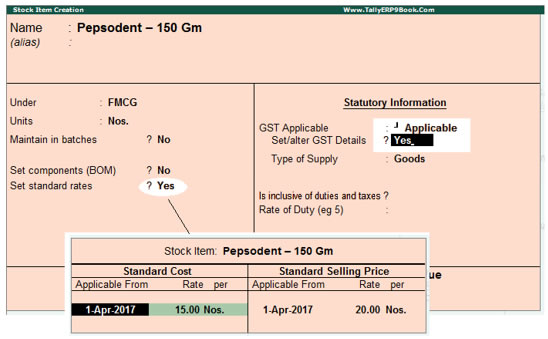
Note : To view the field Set Standard Rates , Activate Allow Standard Rates for Stock Items in F12 : Configure.
Step 4 : Recording Transactions or Voucher Entry
M/s Swayam Plaza purchased 100 nos of ‘Pepsodent – 150 gm.’ At the rate of ₹. 15 on 1-7-2017 in Cash. Make an entry in the Purchase Voucher to record this transaction.
M/s Swayam Plaza sold 5 nos of Pepsodent-150 gm. For a total of ₹. 100 on 2-7-2017. The customer pays ₹. 50 by Credit Card, ₹.. 50 by cheque of HDFC Bank and ₹.. 12 by cash. The Sale Voucher to record this transactions is entered as follows :
Go to Gateway of Tally.ERP à Accounting Vouchers à F8 : Sales.
The complete POS Invoice screen will appear as shown :

Note : Press P ( Ctrl + P) for Multi Mode or Single Mode Payment in the right side Button Bar.
On saving the voucher, Tally.ERP asks for a confirmation to print the Invoice.
Click With Preview button to see a preview of the invoice and press Enter.
The printed invoice will appear as shown :

Step 5 : POS Reports
To view the list of POS Invoice Statement
Go to Gateway of Tally.ERP à Display à Accounts Books à POS Register
Click F1 : Details
Note : POS Register options will appear , only if the option Use for POS Invoicing is activated in Voucher Type and at least one entry has been made.
The POS Register displays as shown :

Note : You can also view the Inventory details in POS Register by setting Show Inventory Details also to YES in F12 : Configure.

|


 @ Rs. 700")
 @ Rs. 600")
 @ Rs. 550")
 @ Rs. 600")
 @ Rs. 600")